Sky replacement with Photoshop
In this lesson we’re going to learn how to realistically replace the sky in our images to make them really POP! We’ll be using Adobe Photoshop for this lesson, and if you don’t already have photoshop you can download a 7-day trial here.
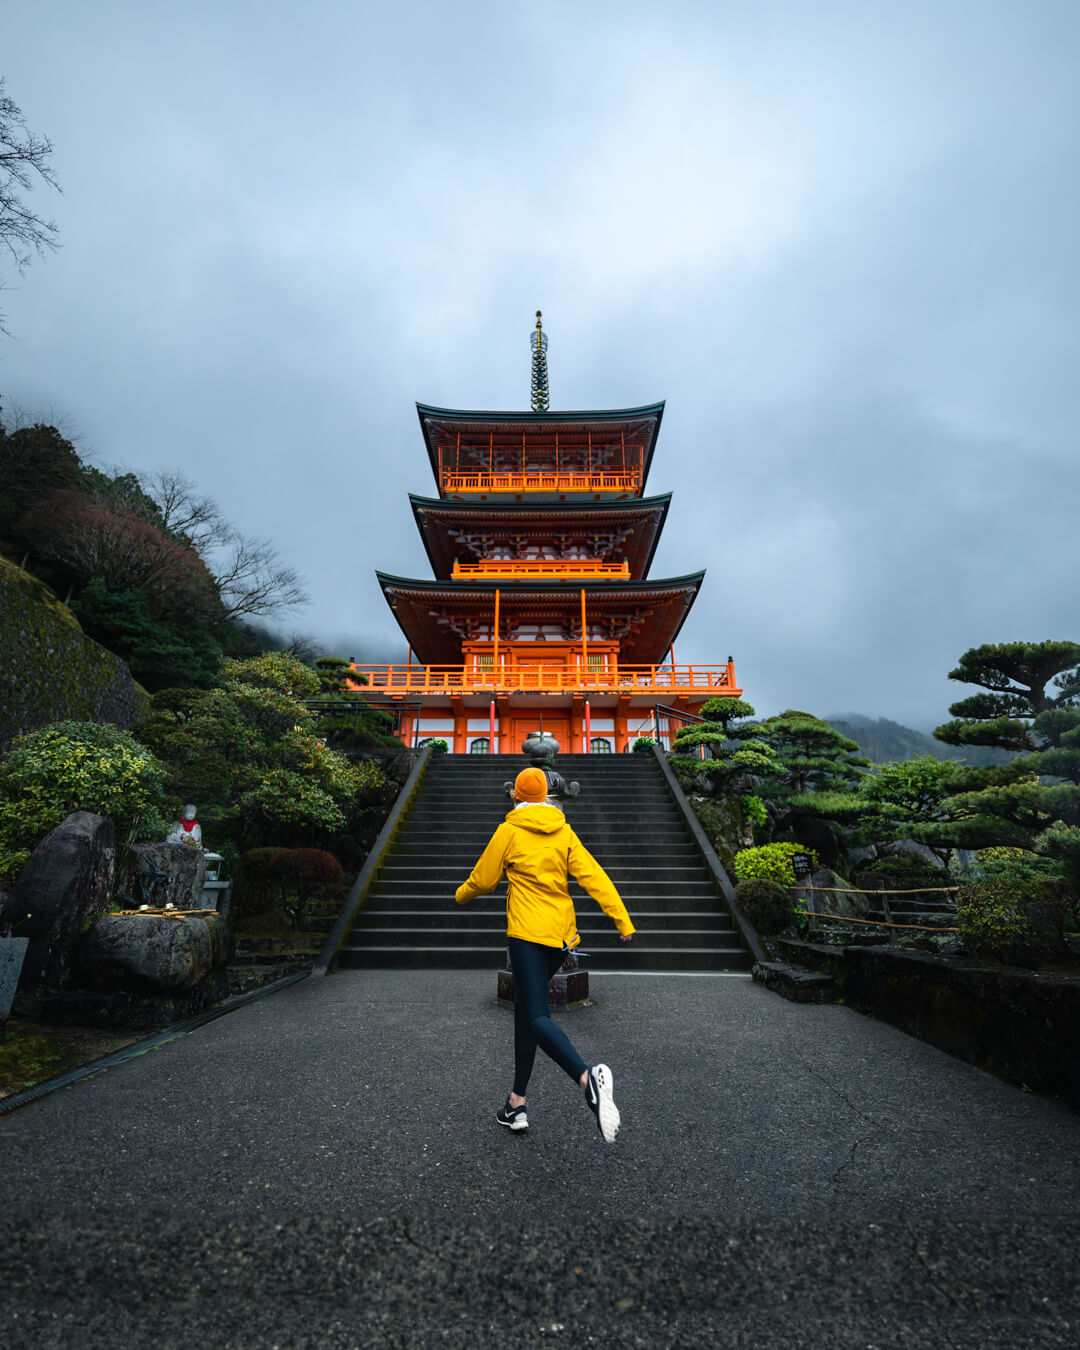
Here is our original image, which you’re welcome to download and try for yourself:
To get started with editing the image, we can either drag a photo from any folder on our desktop to Photoshop or use the “Edit In” feature in Lightroom which creates a link between the two programs and keeps our workflow clean. So let’s go with the second option.
- Press Command + J to duplicate the Background layer.
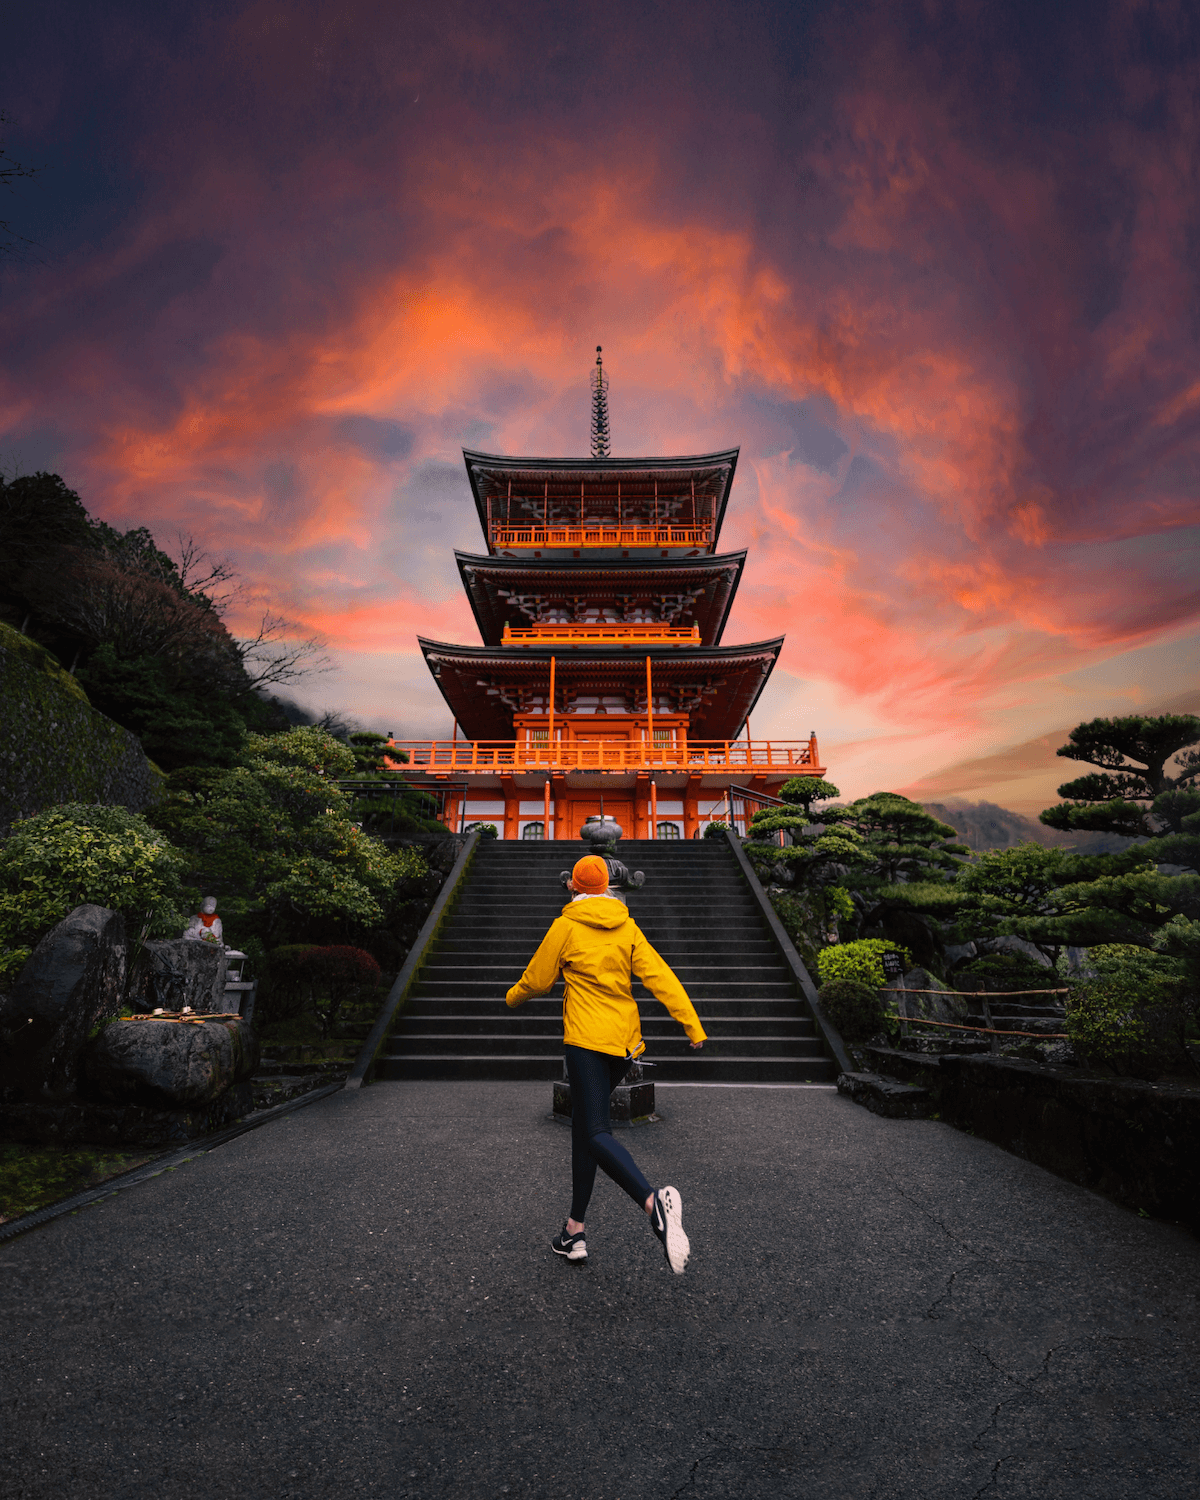
- Then on the top menu bar, go to Edit > Sky Replacement. A popup box will appear with the sky replacement control. Let’s check the Preview so that we can see how it appears on our image as we go along with the edit.
- If you wish to change the current sky being set by Photoshop, click on the sky image tab and look for the one you see fit.
- Now, let’s set the Shift Edge to determine where the border between the sky and the original image begins. Generally speaking, you’ll get a spot-on setup right from the beginning, and in this case, I’m pretty happy with where that is, so just leave it at 0.
- Then, on the Fade Edge, which sets the amount of fading or feathering from the sky image to the original photo along the edges, let’s set the amount down to 70.
- Leave the Brightness to 0, but then set the Temperature to 10 to give more warmth to the clouds to match the light orange tone on the pagoda.
- Leave the Scale to 100 because it kind of gives a halo effect onto the pagoda which looks really nice.
- Leave the Lighting Mode (the blending mode used for lighting adjustments) to Multiply; then set the Lighting Adjustment (to lighten or darken the part of the original image that blends with the sky) to 80 so that we can have an extra moody feeling to it while avoiding artifacts in the sky.
- Set the Color Adjustment (to determine how strongly the part of the original image that doesn’t blend with the sky is harmonized with the sky colors) to 65 as we want to give a cooler feeling to it.
- Then click OK. If you can re-adjust everything, just go to the respective layers that have been generated by Photoshop under the Sky Replacement Group folder.
- Finally, press Command + S to save everything and send it back to Lightroom.
Advanced steps
Now, let’s take a look at an example where the sky replacement wasn’t perfect and we need to clean it up a little.

You can see here that we have an overexposed sky as a result of a thick cloud which doesn’t really look nice, and even if we lower down the Highlights, there’s not much that we can recover from.
So before we go into Photoshop, let’s clean up the trees so that we can darken the overall tone later:
- Set the Temp to +1, Highlights to -38, Shadows to -9, Whites to +32, and Clarity to +5.
- Now, go to the Masking tool and select Linear Gradient. Then on the floating Masks tab, click on the three-dot menu on the bottom right, select Color Overlay, and then uncheck Show Overlay.
- Then on the editing panel, set the Highlights to -25, Shadows to -15, Dehaze to +49, and Saturation to 10.
- Finally, right-click on the image and select Edit In > Edit in Adobe Photoshop 2022. You’ll be prompted with a dialog asking what to edit, let’s select “Edit a Copy with Lightroom Adjustments” and click Edit.
Editing in Photoshop
- Press Command + J to create a new layer.
- Then on the top menu bar, go to Edit > Sky Replacement. It’s going to remember the adjustments for the first image you did before. Let’s change the sky into one that’s nice and bright with fluffy clouds on it.
- If you can’t find any that you see fit, you can download one from the internet - my recommendation is Unsplash as they have high quality and are free to use. Then on the sky replacement box, go to the bottom right and click on the plus icon that says “Import sky images” and select the image you’ve downloaded.
- Let’s set the Shift Edge to -7. Then set the Scale to 106 and drag the image upwards to show more of the clouds (be careful of cutting it off though). You can also flip the sky image and see if it looks nicer.
- Now, set the Brightness to 10 and the Temperature to 41. Then set the Lighting Adjustment to 80 and the Color Adjustment to 50.
- At this point, we still have issues with the sky selection overflowing to the edge of the roof. Let’s clean that up first by selecting the layer mask of the Sky layer. Remember that anything that’s white is being affected by the Sky Replacement tool.
- Then grab the Brush tool. Set your Brush to Hard Round and size it appropriately. Then on the bottom left of the program click the small icon where it says “Default Foreground and Background Colors” which is going to apply black as foreground and white as background. Then paint over the edges of the roof to erase the overflow of the sky replacement. On the other hand, if you want to reintroduce the sky replacement, switch to white as the foreground and then brush over the area, but pay attention to your brush settings as it might interfere with the adjustments you’ve made.
- Now, let’s go to the Layers panel and collapse the Sky Replacement Group down. Then press Shift + Option/Alt + Command + E to create a new compound layer out of the entire group of layers.
- We can also see that on the left hand side there’s a small patch as the sky image didn’t fit in the entire space. First, let’s choose the Quick Selection tool and click on the area we want to fill in. If Photoshop is somehow selecting too large of an area, hold down the Option/Alt key to turn the Quick Selection into minus so that you can click to reduce the selection area.
- Then grab the Clone Stamp tool and hold down the Option/Alt key on an area that you can sample to fill in the patch. Keep sampling around and changing the Flow level of your brush until you’re satisfied with the result.
- Now, press Command + S to send it back to Lightroom.
Other examples
Before we dive into more examples, I want you to keep in mind that although you can always replace and edit the sky in the editing program, we still need to think carefully about the sky we want to use and make sure it blends in perfectly with the overall composition - both in terms of matching the color tone and the lighting direction.
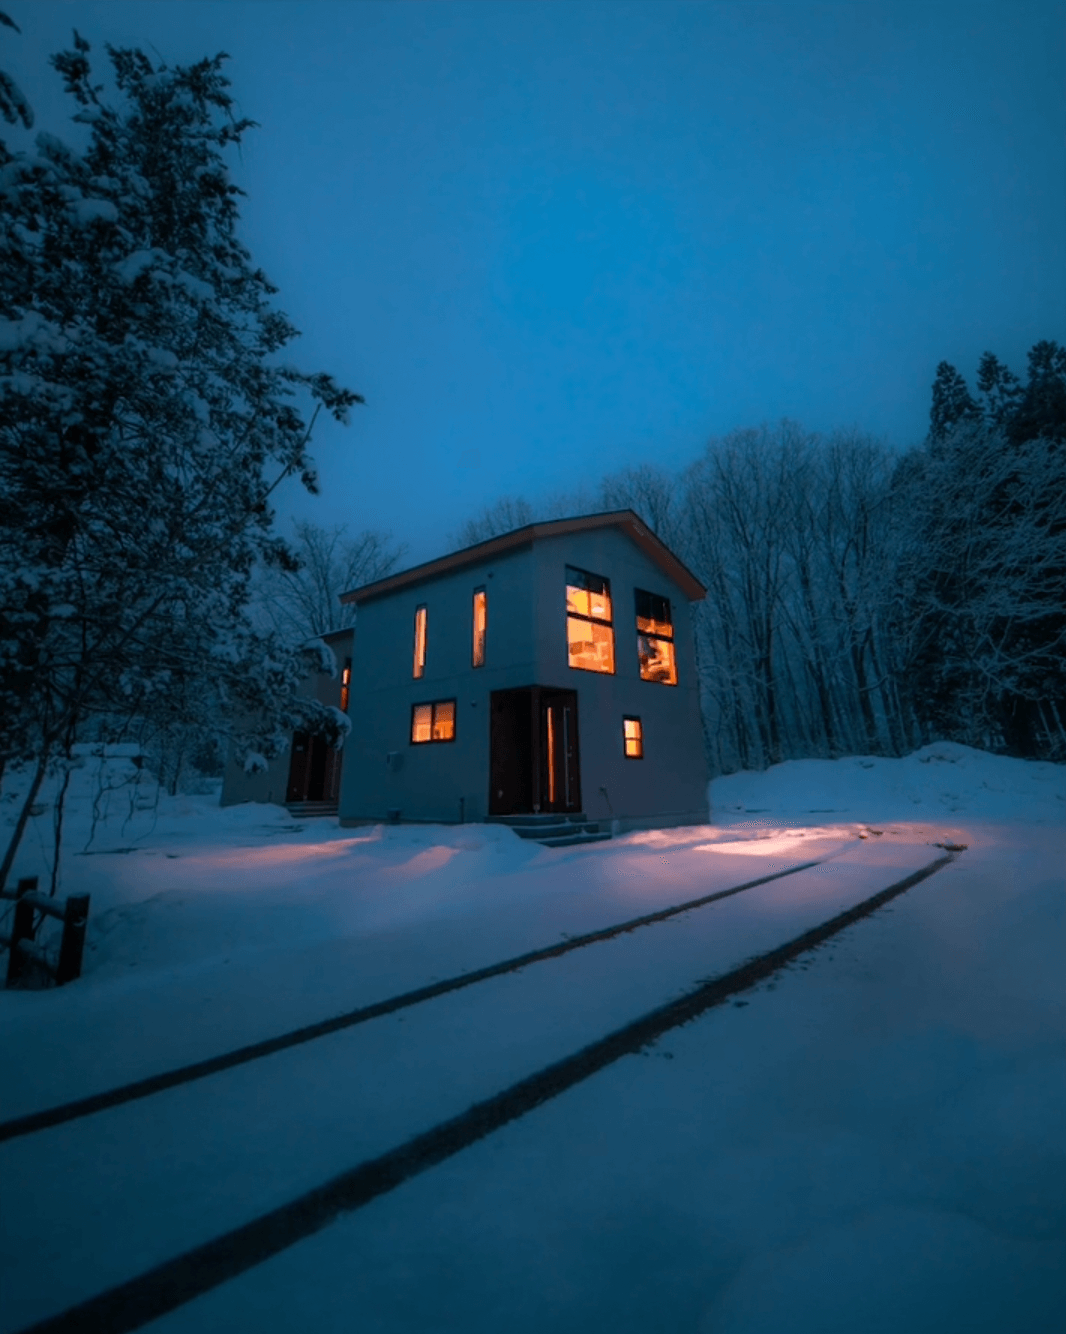
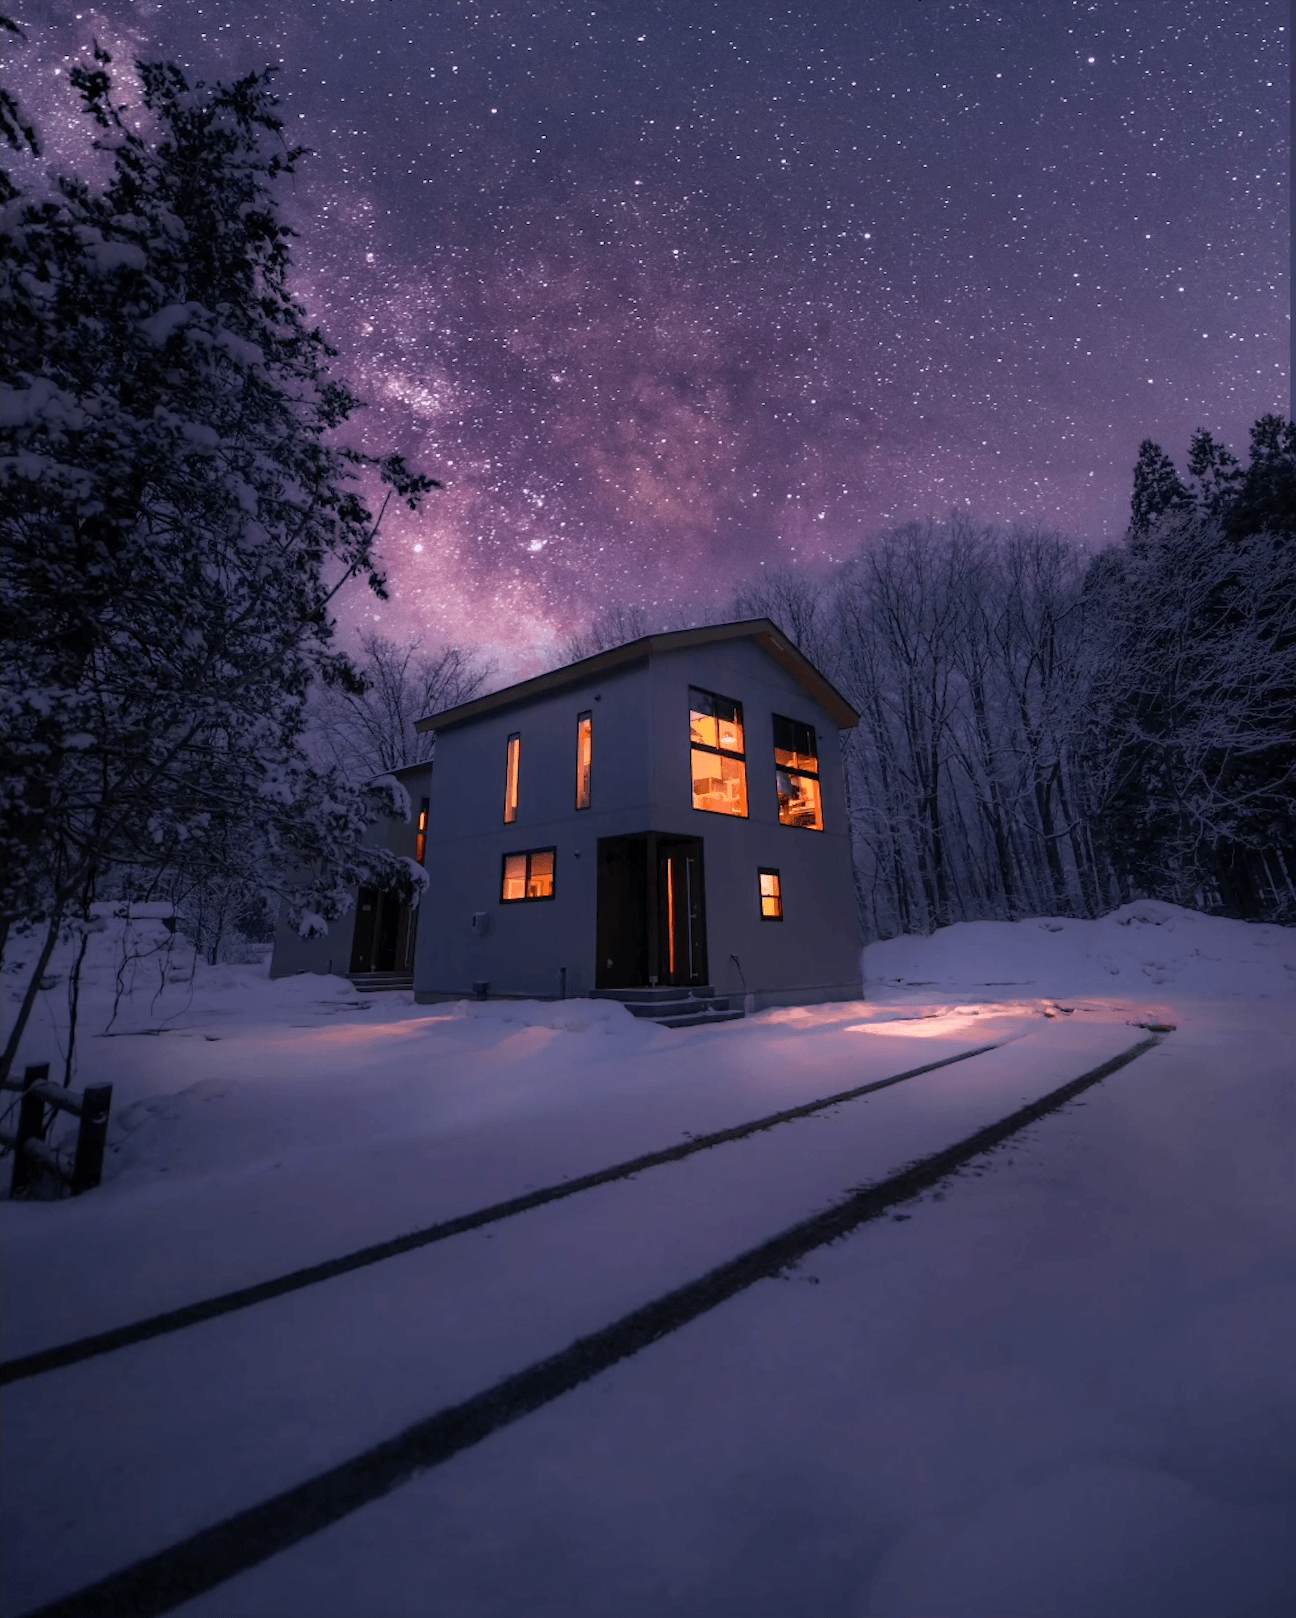
Winter hotel shot in Japan (matching the tone)
- First, let’s download the purple sky we’re going to blend for this image on Unsplash.
- Now, set the Tint to +12
- Go to the HSL/Color panel and choose Blue. Then set the Hue to +43, and the Saturation to -27.
- Finally, right-click on the image and select Edit In > Edit in Adobe Photoshop 2022. You’ll be prompted with a dialog asking what to edit, let’s select “Edit a Copy with Lightroom Adjustments” and click Edit.
Editing in Photoshop
- Press Command + J to create a new layer.
- Then on the top menu bar, go to Edit > Sky Replacement. Then on the sky replacement box, go to the bottom right and click on the plus icon that says “Import sky images” and select the purple sky image you’ve downloaded.
- Now, set the Shift Edge to 16, Fade Edge to 85, Temperature to -44, Lighting Adjustment to 44, and Color Adjustment to 47.
- Press Command + S to send it back to Lightroom.
Wooden bridge on a lake shot (matching the direction of light)
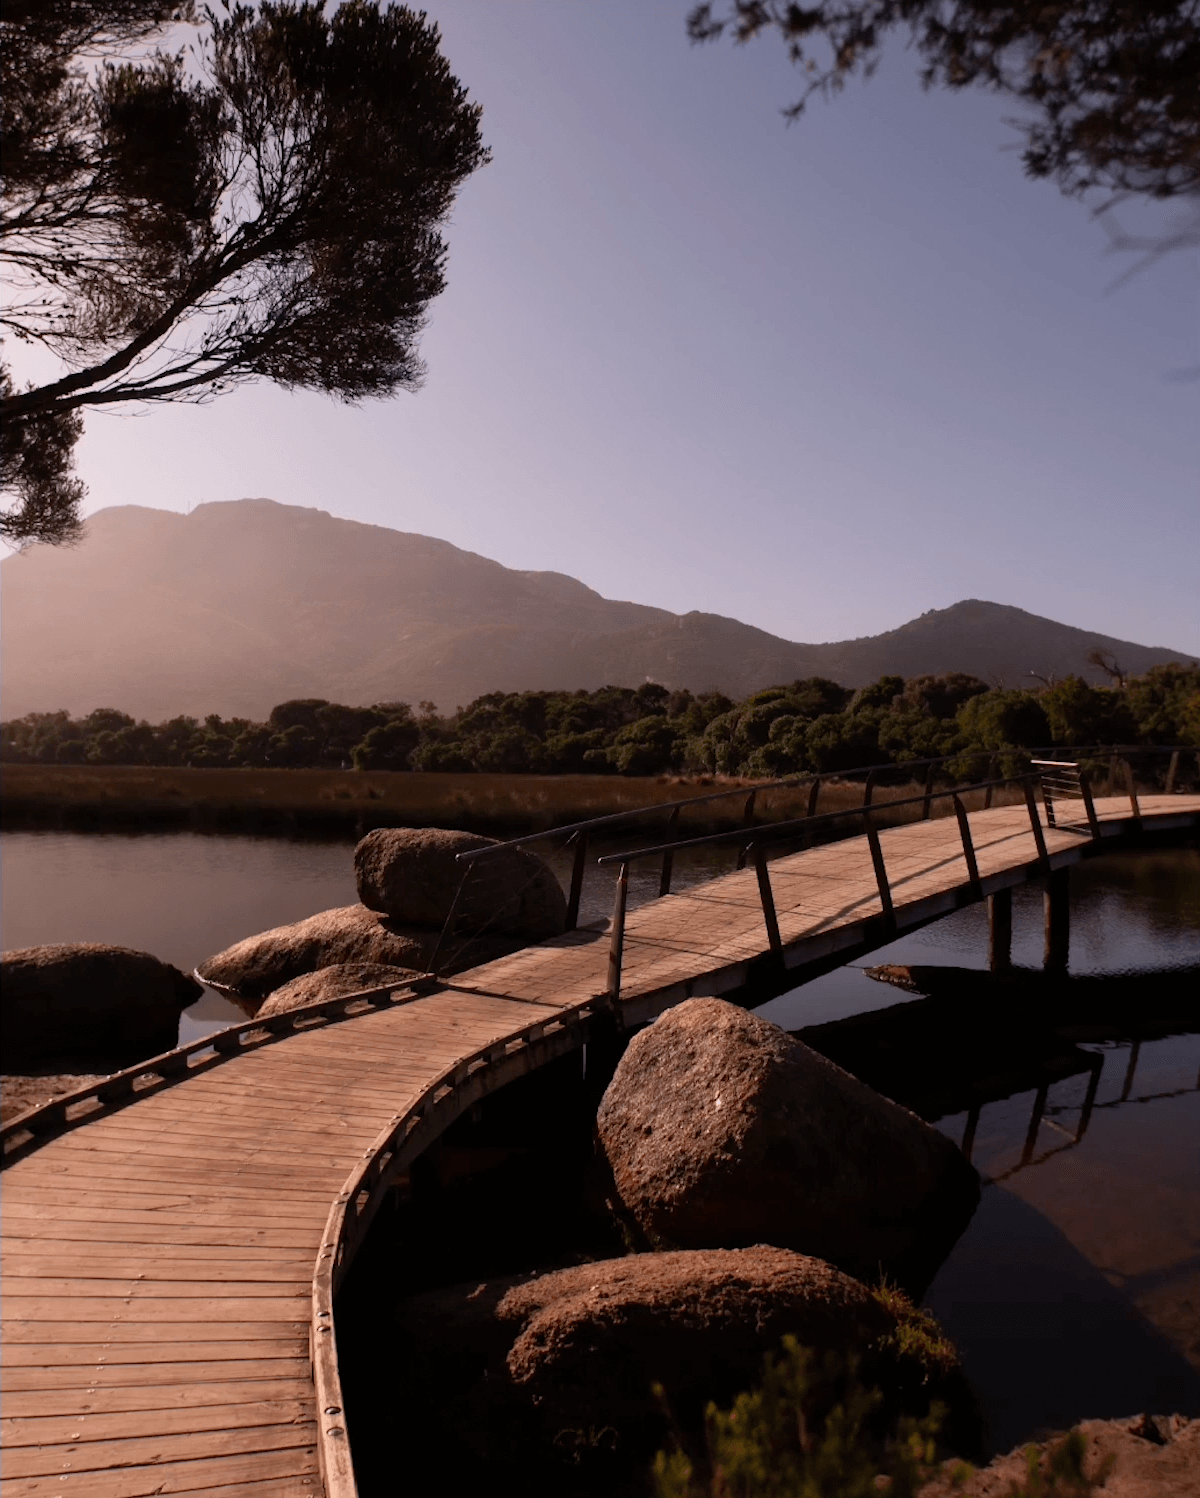
- First, right click on the image and select Edit In > Edit in Adobe Photoshop 2022.
- Press Command + J to create a new layer.
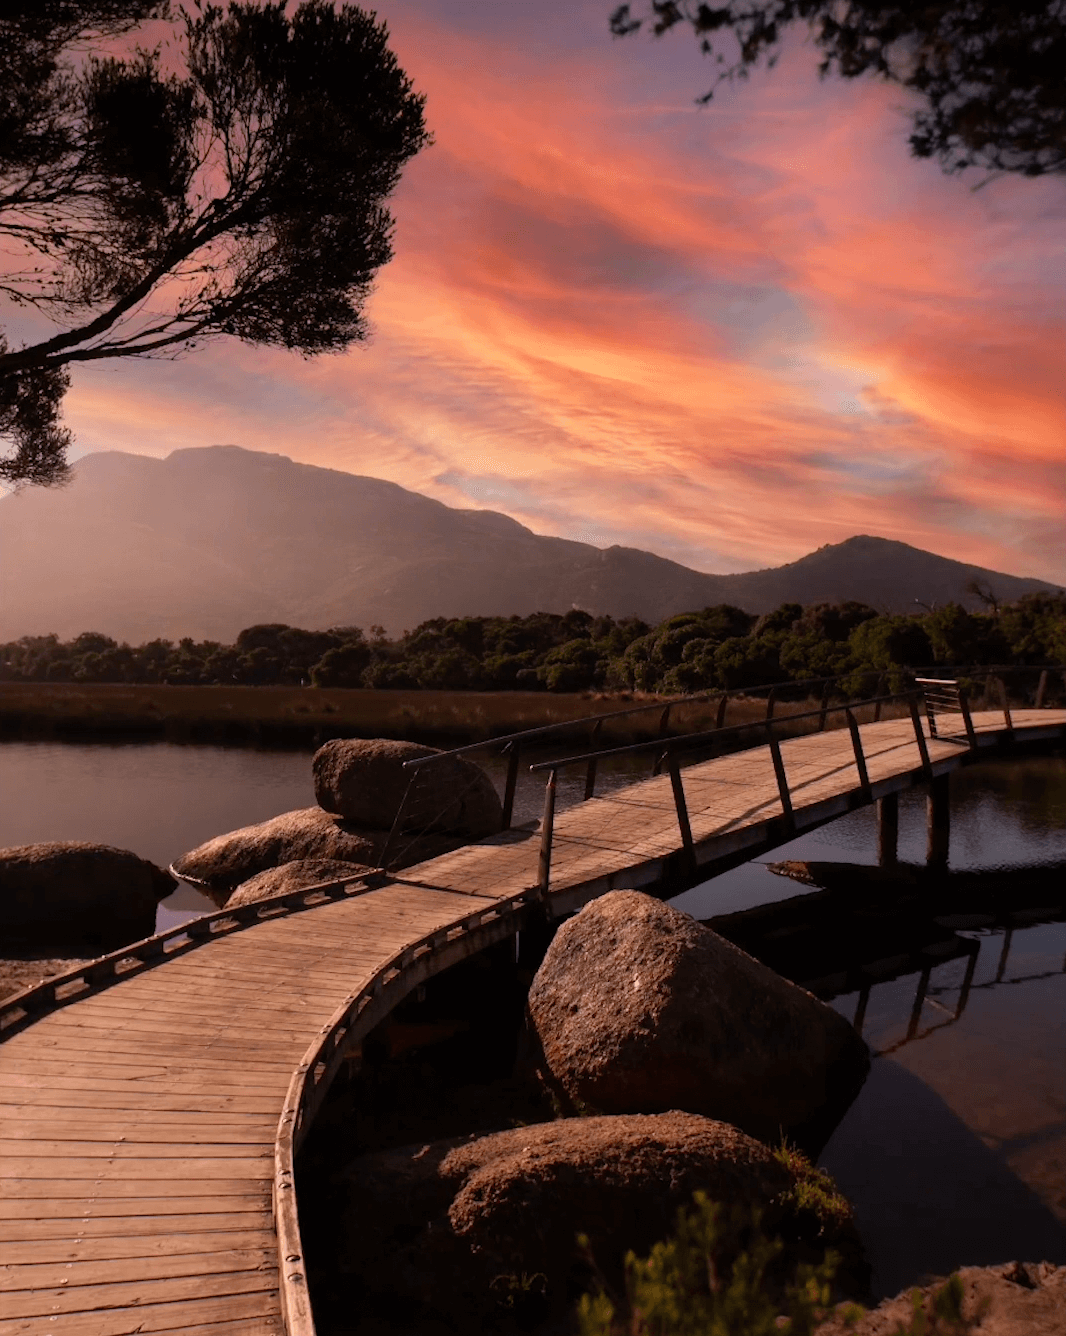
- Then on the top menu bar, go to Edit > Sky Replacement. Then replace our previous purple sky image with a built-in sunset image that has a direction of light matching the base image (left hand side).
- Set the Temperature to 43 to add more warmth and match the tone of the base image. Then set the Scale to 121 to give us extra wiggle room to drag the sky image around.
- The only thing that’s missing from making this a perfect composition would be to replace the reflection to match the sky. But that’s a whole different ball game in Photoshop, so we’re going to leave it as is and press Command + S to send it back to Lightroom.
Editing back in Lightroom
- Go to the Tone Curve panel and create an adjustment point in the Darks region and drag it down a bit. Then do the same thing with the Lights region but this time upwards.
- Set the Temp to -3
- Then go to the Masking tool and select Linear Gradient. Then make a gradient by dragging from the lower half of the image to light up the space at the bottom a little bit more.
- On the Linear Gradient panel, set the Temp to -10, the Tint to -15, the Exposure to 0.08 and the Shadows to 23.
- Then click Done.
That’s the sky replacement and I hope you learn a lot here. I’m so excited to see what you can come up with, both with the images that I give you as an example, and also some of the ones that you might have changed as well. Good luck!